Introduction to Metallography
Learn the fundamentals of metallography, including what it is, why it matters, and how it's used in materials science and engineering to understand material structure and properties.
Table of Contents
What is Metallography?
Metallography is the scientific study and analysis of the microstructure of metals and alloys. The term comes from the Greek words "metallon" (metal) and "graphos" (to write or describe), literally meaning "the description of metals." Through careful sample preparation and microscopic examination, metallography reveals the internal structure of materials, allowing scientists and engineers to understand how a material's structure relates to its properties and performance.

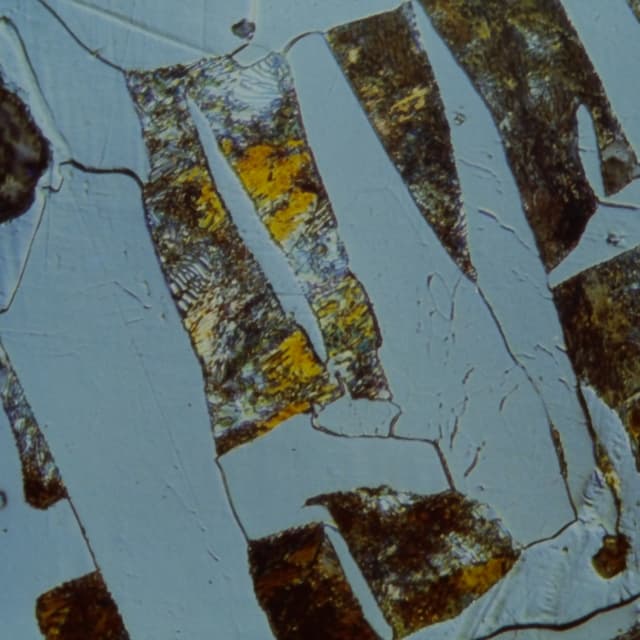
Example microstructure: Ferrite and pearlite in steel. Metallography reveals the internal structure that determines material properties.
At its core, metallography involves three main steps:
- Sample preparation: Cutting, mounting, grinding, polishing, and etching a representative sample to reveal its microstructure
- Microscopic examination: Observing the prepared sample under a metallurgical microscope to study its structure
- Analysis and interpretation: Understanding what the microstructure reveals about the material's composition, processing history, and properties
While the name suggests it's limited to metals, modern metallography techniques are also applied to ceramics, composites, polymers, and other engineering materials. The principles remain the same: prepare a sample to reveal its true structure, then examine and analyze it to understand the material.
Key Insight: Metallography bridges the gap between a material's processing history and its final properties. By examining microstructure, we can understand why a material behaves the way it does and how to improve it.
Why Metallography Matters
Metallography is fundamental to materials science and engineering because it provides direct insight into the relationship between structure and properties. The microstructure of a material (its grain size, phase distribution, defects, and other features) directly determines its mechanical, electrical, thermal, and chemical properties.
For a more detailed exploration of the purpose and applications of metallography, see our comprehensive guide on Purpose and Applications of Metallography.
Understanding Material Behavior
Every material's behavior (whether it's strong or weak, ductile or brittle, corrosion-resistant or susceptible) can be traced back to its microstructure. Metallography allows us to:
- Explain material properties: Understand why a material has specific strength, hardness, or other characteristics based on its internal structure
- Predict performance: Use microstructure analysis to anticipate how a material will perform under different conditions
- Optimize processing: Identify the best heat treatment, mechanical working, or other processing steps to achieve desired properties
- Diagnose problems: Identify the root cause of material failures or performance issues
Quality Control and Assurance
In manufacturing and production, metallography serves as a critical quality control tool:
- Verification: Confirm that materials meet specifications and standards
- Process monitoring: Ensure manufacturing processes are producing consistent, high-quality materials
- Batch validation: Verify that each production batch meets required microstructure criteria
- Certification: Provide documentation for materials used in critical applications
Research and Development
Metallography is essential in materials research and development:
- New material development: Characterize and optimize new alloys and materials
- Process development: Understand how different processing methods affect structure
- Fundamental research: Study the relationships between processing, structure, and properties
- Failure analysis: Investigate why materials fail and how to prevent failures
Real-World Impact: Metallography is used in industries ranging from aerospace and automotive to medical devices and electronics. It ensures that materials meet safety and performance requirements in critical applications.
A Short History of Metallography
Understanding the history of metallography provides context for how this field developed and why certain techniques and principles are fundamental today. While humans have been working with metals for thousands of years, the scientific study of microstructure is relatively recent.
H. C. Sorby: The Father of Metallography
The field of metallography as we know it today began with Henry Clifton Sorby (1826-1908), an English geologist and metallurgist. In 1863, Sorby adapted techniques from petrography (the study of rocks) to examine metals. He was the first to prepare metal samples by grinding and polishing, then observe them under a microscope. Sorby's groundbreaking work revealed that metals had internal structures (grains, phases, and other features) that could be studied and related to material properties.
Sorby's contributions were revolutionary. He developed methods for sample preparation, used chemical etching to reveal microstructures, and made detailed observations of steel microstructures. His work established the foundation for modern metallography, demonstrating that the internal structure of metals could be systematically studied and understood.
Modern Evolution
Since Sorby's pioneering work, metallography has evolved significantly. The development of electron microscopy (SEM and TEM) in the mid-20th century enabled observation at much higher magnifications. Today, advanced techniques like electron backscatter diffraction (EBSD), energy-dispersive X-ray spectroscopy (EDS), and automated image analysis provide unprecedented insight into material structure.
Historical Perspective: From Sorby's first observations to today's advanced analytical techniques, metallography has evolved from a descriptive science to a quantitative discipline. The fundamental principles established by early metallographers remain valid, but modern tools provide unprecedented insight into material structure.
This section provides a brief overview of metallography's history. For a comprehensive exploration of the field's evolution, including ancient foundations, the Industrial Revolution era, electron microscopy developments, and modern digital techniques, see our complete History of Metallography guide.
Basic Concepts and Terminology
Understanding metallography requires familiarity with key concepts and terminology. These fundamental terms will help you navigate the field and understand material structures. For a comprehensive reference, see our Metallography Glossary.
Microstructure
The microstructure is the internal structure of a material as observed under a microscope. It includes:
- Grains: Individual crystals within a polycrystalline material. Grain sizesignificantly affects material properties.
- Phases: Distinct regions with different chemical compositions or crystal structures (e.g., ferrite and cementite in steel).
- Grain boundaries: Interfaces between adjacent grains where atoms are less regularly arranged.
- Precipitates: Small particles of a second phase that form within the primary phase.
- Defects: Imperfections such as inclusions, voids, cracks, or dislocations.
Sample Preparation
Proper sample preparation is critical for accurate metallographic analysis. The process typically includes:
- Sectioning: Cutting a representative sample from the larger workpiece
- Mounting: Embedding the sample in resin for easier handling
- Grinding: Removing surface damage and creating a flat surface using progressively finer abrasives
- Polishing: Creating a mirror-like surface free of scratches
- Etching: Applying chemical reagents to reveal the microstructure
Common Microstructural Features
| Term | Definition | Significance |
|---|---|---|
| Grain Size | Average size of individual crystals | Affects strength, toughness, and ductility. Smaller grains generally increase strength. |
| Phase | Region with uniform composition and structure | Different phases have different properties. Phase distribution determines overall material behavior. |
| Grain Boundary | Interface between adjacent grains | Affects material properties and can be sites for precipitation or failure initiation. |
| Precipitate | Small particles of a second phase | Can strengthen materials (precipitation hardening) or affect other properties. |
| Inclusion | Non-metallic particles in the material | Can act as stress concentrators and affect mechanical properties, especially toughness. |
| Work Hardening | Increase in strength due to plastic deformation | Visible as elongated grains or deformation bands. Affects material formability. |
Magnification and Observation
Metallographic examination typically uses:
- Optical microscopy: Standard light microscopy at magnifications from 50x to 1000x. Most common for routine analysis.
- Scanning electron microscopy (SEM): Higher magnification (up to 100,000x+) and greater depth of field. Used for detailed analysis of fine features.
- Transmission electron microscopy (TEM): Very high magnification for atomic-scale analysis. Used in advanced research.
Learning Tip: Start with understanding grain structure and phases. These are the most fundamental microstructural features and appear in virtually all metallographic analysis.
Phases and Phase Transformations
Understanding phases (distinct regions with uniform composition and crystal structure) is fundamental to metallography. Different phases have different properties, and the distribution, size, and morphology of phases determine overall material behavior. Phase transformations, driven by heat treatment and processing, create these microstructures.
Common Phases in Steels
Steels are iron-carbon alloys, and their microstructures consist of various phases that form depending on composition and heat treatment:
Ferrite (α-Fe)
Body-centered cubic (BCC) iron with low carbon solubility. Soft, ductile, and magnetic. Appears light in etched microstructures.
Austenite (γ-Fe)
Face-centered cubic (FCC) iron with higher carbon solubility. Stable at high temperatures. Transforms to other phases on cooling. Non-magnetic.
Martensite
Hard, brittle phase formed by rapid quenching from austenite. Body-centered tetragonal structure. Very high strength and hardness but low ductility. Appears as needle-like or lath structures.
Pearlite
Lamellar structure of alternating ferrite and cementite (Fe₃C) plates. Forms from slow cooling of austenite. Moderate strength and good machinability. Appears as alternating light and dark bands.

Bainite
Intermediate transformation product between pearlite and martensite. Forms at intermediate cooling rates. Fine, acicular (needle-like) structure. Good combination of strength and toughness.
Cementite (Fe₃C)
Iron carbide phase. Very hard and brittle, and resistant to common etchants, so its appearance depends on how the surrounding structure responds: under nital the ferrite is attacked preferentially, so cementite stays bright by contrast; under picral the ferrite–cementite interfaces are attacked, outlining the carbide so it appears dark. Picral is the preferred etchant when you need clear cementite contrast — for example, resolving fine pearlite lamellae or imaging proeutectoid carbide networks. Present in pearlite, bainite, and as separate particles in some steels.
Grain Boundaries
Grain boundaries are interfaces between adjacent grains (crystals) in a polycrystalline material. They are important because:
- Property influence: Grain boundaries affect strength, ductility, and other properties. Finer grains (more grain boundary area) generally increase strength.
- Precipitation sites: Second phases often form preferentially at grain boundaries during heat treatment.
- Failure initiation: Grain boundaries can be sites where cracks initiate, especially under stress or in corrosive environments.
- Diffusion paths: Atoms and defects move more easily along grain boundaries, affecting processes like creep and corrosion.
- Etching response: Grain boundaries etch preferentially, making them visible under the microscope.
Phase Transformations
Phase transformations occur when materials are heated or cooled, changing their microstructure. Understanding these transformations is crucial for metallography:
Heat Treatment Relationships
- Annealing: Slow cooling produces soft, coarse microstructures (e.g., ferrite and pearlite in steel)
- Normalizing: Air cooling produces finer, more uniform microstructures
- Quenching: Rapid cooling produces hard phases (e.g., martensite in steel)
- Tempering: Reheating quenched materials reduces hardness and increases toughness
- Aging/Precipitation: Time-dependent phase formation at specific temperatures
Processing Relationships
- Cold working: Mechanical deformation at low temperatures creates elongated grains and increases strength (work hardening)
- Hot working: Deformation at high temperatures allows recrystallization, producing new, equiaxed grains
- Recrystallization: Formation of new, strain-free grains after cold working
- Grain growth: Increase in average grain size at elevated temperatures
Key Principle: The microstructure you observe is a "snapshot" of the material's processing history. By understanding phase transformations, you can interpret what processing steps a material has undergone and predict its properties.
Phase Diagrams
Phase diagrams (equilibrium diagrams) show which phases are stable at different temperatures and compositions. While metallography examines actual microstructures (which may differ from equilibrium due to processing), phase diagrams provide essential reference information for understanding what phases should be present and how they form.
Applications of Metallography
Metallography finds applications across numerous industries and research areas. Understanding these applications helps illustrate the practical importance of the field.
For a comprehensive guide covering the purpose and detailed applications of metallography across different industries and use cases, see our Purpose and Applications guide.
Quality Control and Inspection
One of the most common applications is quality control in manufacturing:
- Material verification: Confirming that received materials meet specifications
- Process validation: Ensuring heat treatment, welding, or other processes produce the expected microstructure
- Batch testing: Verifying consistency across production batches
- Standards compliance: Meeting industry standards and specifications (ASTM, ISO, etc.)
Failure Analysis
When materials fail, metallography helps identify the cause:
- Fracture analysis: Examining fracture surfaces to understand failure mechanisms
- Root cause identification: Determining whether failure was due to material defects, processing issues, or service conditions
- Prevention strategies: Using failure analysis to prevent future failures
- Legal and insurance: Providing evidence in failure investigations
Research and Development
Metallography is essential in materials research:
- Alloy development: Characterizing new alloys and understanding structure-property relationships
- Process optimization: Determining optimal processing conditions for desired microstructures
- Fundamental studies: Researching phase transformations, grain growth, and other microstructural phenomena
- Material selection: Comparing different materials for specific applications
Industry-Specific Applications
Aerospace
- • Titanium and superalloy characterization
- • Coating and surface treatment analysis
- • Fatigue and creep damage assessment
Automotive
- • Steel and aluminum processing verification
- • Heat treatment validation
- • Weld quality assessment
Medical Devices
- • Implant material characterization
- • Biocompatibility studies
- • Surface finish verification
Energy
- • Power plant material analysis
- • Pipeline and pressure vessel inspection
- • Corrosion and degradation studies
Versatility: While metallography is often associated with metals, the same principles apply to ceramics, composites, and other materials. The goal is always to understand structure-property relationships.
Standards and Best Practices
Metallography is guided by established standards and best practices that ensure consistency, reproducibility, and quality. Following these standards is essential for reliable results and industry acceptance of your work.
ASTM Standards
The American Society for Testing and Materials (ASTM) publishes numerous standards relevant to metallography. ASTM Committee E-4 on Metallography, formed in 1916, has developed over 40 standards that guide metallographic practice. These standards are widely used in the United States and have influenced international standardization efforts. Key standards include:
| Standard | Title | Description |
|---|---|---|
| ASTM E3 | Standard Guide for Preparation of Metallographic Specimens | General procedures for sample preparation including sectioning, mounting, grinding, polishing, and etching. |
| ASTM E407 | Standard Practice for Microetching Metals and Alloys | Procedures and reagents for etching various metals and alloys to reveal microstructure. |
| ASTM E112 | Standard Test Methods for Determining Average Grain Size | Methods for measuring and reporting grain size, including comparison charts and intercept methods. |
| ASTM E883 | Standard Guide for Reflected-Light Photomicrography | Guidelines for capturing high-quality photomicrographs for documentation and analysis. |
| ASTM E1245 | Standard Practice for Determining the Inclusion or Second-Phase Constituent Content of Metals | Methods for quantifying non-metallic inclusions and second-phase particles. |
| ASTM E1382 | Standard Test Methods for Determining Average Grain Size Using Semiautomatic and Automatic Image Analysis | Computer-based methods for grain size measurement using image analysis software. |
ISO Standards
The International Organization for Standardization (ISO) also publishes standards for metallography, particularly for international trade and certification:
- ISO 643: Steels: Micrographic determination of the apparent grain size
- ISO 4499: Hardmetals: Metallographic determination of microstructure
- ISO 4967: Steel: Determination of content of non-metallic inclusions - Micrographic method using standard diagrams
- ISO 14250: Steel: Metallographic characterization of duplex grain size and distributions
Safety Considerations
Metallography involves working with chemicals, equipment, and potentially hazardous materials. Safety must always be a priority:
Chemical Safety
- • Always read Safety Data Sheets (SDS) for all chemicals before use
- • Use appropriate personal protective equipment (gloves, eye protection, lab coat)
- • Work in well-ventilated areas, preferably in a fume hood when using etchants
- • Store chemicals properly and label all containers clearly
- • Dispose of chemical waste according to local regulations
- • Never mix chemicals unless you know the reaction products are safe
Equipment Safety
- • Follow manufacturer instructions for all equipment
- • Use proper guards and safety features on cutting and grinding equipment
- • Secure samples properly to prevent movement during cutting or grinding
- • Be aware of rotating equipment and moving parts
- • Keep work areas clean and organized to prevent accidents
- • Use appropriate eye protection when operating any equipment
Best Practices for Quality Results
- Documentation: Record all preparation parameters (grit sizes, times, pressures, etchants, etching times) for reproducibility
- Consistency: Follow standardized procedures to ensure consistent results
- Cleanliness: Keep equipment and work areas clean to prevent contamination
- Calibration: Regularly calibrate equipment (microscopes, hardness testers, etc.)
- Reference samples: Maintain reference samples of known quality for comparison
- Training: Ensure operators are properly trained in techniques and safety
- Quality control: Establish quality control procedures and checkpoints
Standards Compliance: When working to meet specific standards or certifications, ensure you have the current version of relevant standards and follow them precisely. Standards are regularly updated, so check for revisions.
The Sample Preparation Process
Successful metallographic analysis depends on proper sample preparation. A poorly prepared sample will not reveal the true microstructure, leading to incorrect conclusions. The preparation process follows a logical sequence, with each step building on the previous one.
Overview of the Preparation Steps
The standard metallographic preparation process consists of five main steps:
1. Sectioning
Cutting a representative sample from the larger workpiece. The goal is to obtain a sample that represents the material or feature of interest while minimizing damage. Sectioning can be done using abrasive cutting or precision wafering, depending on the material and requirements.
Learn more about Sectioning →2. Mounting
Embedding the sample in resin to create a standardized, easy-to-handle mount. Mounting protects edges, makes small samples manageable, and creates a uniform surface for grinding and polishing. Compression mounting and castable mounting are the two main methods.
Learn more about Mounting →3. Grinding
Removing surface damage from sectioning and creating a flat surface using progressively finer abrasives. Grinding typically progresses from coarse grits (e.g., 120 grit) to fine grits (e.g., 600 or 800 grit). Proper grinding removes damage while minimizing introduction of new damage.
Learn more about Grinding Techniques →4. Polishing
Creating a mirror-like surface free of scratches. Polishing uses fine abrasives (diamond pastes, suspensions, or oxide polishing compounds) on cloth-covered platens, typically progressing from harder woven cloths to soft napped cloths for the final step. The goal is to remove all grinding scratches and create a deformation-free surface suitable for microscopic examination.
Learn more about Polishing Methods →5. Etching
Applying chemical reagents to reveal the microstructure. Etching selectively attacks different phases and grain boundaries, creating contrast that makes microstructural features visible under the microscope. Different materials require different etchants.
Learn more about Etching →Key Principles
Throughout the preparation process, several key principles apply:
- Progressive refinement: Each step removes damage from the previous step while introducing minimal new damage
- Consistency: Using standardized procedures ensures reproducible results
- Material-specific techniques: Different materials may require different approaches (e.g., soft materials need gentler techniques to avoid smearing)
- Quality at each step: Poor preparation at any step cannot be fully corrected later
- Documentation: Recording preparation parameters helps troubleshoot issues and reproduce results
Important: Sample preparation is both an art and a science. While the steps are straightforward, achieving excellent results requires practice, attention to detail, and understanding of material-specific requirements. Each material may need slight variations in technique.
Common Problems and Solutions
New metallographers often encounter specific problems during preparation. Understanding these issues and their solutions helps you achieve better results:
| Problem | Common Causes | Solutions |
|---|---|---|
| Scratches remaining after polishing |
|
|
| Edge rounding |
|
|
| Relief (height differences between phases) |
|
|
| Embedded abrasives |
|
|
| Over-etching |
|
|
| Under-etching |
|
|
| Contamination |
|
|
These challenges are normal and improve with experience. Our Troubleshooting Guide provides more detailed solutions to common problems.
Microscopy Techniques
Once a sample is properly prepared, various microscopy techniques can be used to examine and analyze the microstructure. Each technique has specific advantages and applications. Understanding these techniques helps you select the appropriate method for your analysis needs.
For comprehensive information on preparing samples for microscopy, choosing the right microscope, detailed microscopy methods, and interpreting common microstructures, see our complete guide on Microstructural Analysis.
Quick Overview: Most routine metallographic analysis uses optical (metallurgical) microscopes with reflected light illumination. For higher magnification needs or fracture surface examination, scanning electron microscopy (SEM) is used. Advanced techniques like EBSD and TEM provide specialized information for research applications.
Getting Started
If you're new to metallography, here's a practical path to get started:
1. Learn the Fundamentals
Start with understanding the basics:
- Read this guide and understand what metallography is and why it matters
- Familiarize yourself with basic terminology (grains, phases, microstructure) - see our Glossary for definitions
- Understand the relationship between structure and properties
- Learn about the preparation process overview
- Review Equipment Overview to understand what equipment you'll need
- Study Safety Fundamentals before working in the laboratory
- Read Common Misconceptions to avoid beginner mistakes
2. Study the Preparation Process
Work through the process guides in order:
- Sectioning - Learn how to cut samples properly
- Mounting - Understand mounting methods and when to use each
- Grinding Techniques - Master progressive grinding
- Polishing Methods - Learn to create scratch-free surfaces
- Etching - Study material-specific etching requirements (see Common Etchants Guide)
3. Practice with Your Materials
Once you understand the basics:
- Start with simple, common materials (e.g., carbon steel, aluminum)
- Follow material-specific guides for your materials of interest
- Practice the preparation steps and refine your technique
- Compare your results with reference microstructures
4. Use Available Resources
Take advantage of the resources available:
- Glossary - Look up technical terms and definitions
- Preparation Checklist - Use checklists to ensure you don't miss steps
- Troubleshooting Guide - Reference when you encounter problems
- Etchant Reference - Find the right etchant for your material
- Material-specific guides for detailed procedures
5. Build Experience
Metallography improves with practice:
- Prepare multiple samples to build consistency
- Document your procedures and results
- Learn from mistakes and refine your technique
- Seek feedback from experienced metallographers
- Compare your results with published microstructures
Recommended Learning Path
- Start here: Read this introduction to understand the fundamentals
- Basics guides: Review Equipment Overview, Safety Fundamentals, and Common Misconceptions
- Process guides: Study sectioning, mounting, grinding, and polishing guides
- Material guides: Find material-specific guides for your materials
- Practice: Prepare samples and refine your technique
- Advanced topics: Explore application-specific guides and advanced techniques
Next Steps
Now that you understand the fundamentals of metallography, you're ready to dive deeper:
- Explore the complete guides library for detailed information on each preparation step
- Check out resources for checklists, charts, and troubleshooting help
- Reference the glossary when you encounter unfamiliar terms
- Use our tools to help with etchant selection, grit size conversion, and more
- Consider material-specific guides if you're working with particular materials
Remember: metallography is a skill that develops with practice. Don't be discouraged if your first samples aren't perfect. Each sample you prepare teaches you something new, and with time and experience, you'll develop the expertise to prepare excellent samples consistently.
Further Reading and Resources
This introduction provides a foundation, but metallography is a deep field with extensive literature. The following resources offer more detailed information for those who want to dive deeper.
Essential Books
ASM Handbook, Volume 9: Metallography and Microstructures
Comprehensive reference covering all aspects of metallography. Includes detailed procedures, microstructural interpretation, and material-specific information. Essential reference for any metallography laboratory.
Published by ASM International. Regularly updated with new editions.
Metallography: Principles and Practice by George F. Vander Voort
Comprehensive textbook covering sample preparation, microscopy, and microstructural interpretation. Excellent for both beginners and experienced metallographers. Includes extensive information on etching and material-specific techniques.
Published by ASM International. Considered one of the definitive texts on metallography.
Practical Metallography by L.E. Samuels
Practical guide focusing on sample preparation techniques. Excellent for understanding the "how-to" aspects of metallography with detailed procedures and troubleshooting.
Published by ASM International. Strong emphasis on practical techniques.
Industry Resources
Equipment and consumable manufacturers provide valuable application notes and technical resources:
- Buehler: Technical guides, application notes, and educational resources covering metallographic preparation techniques.
- LECO: Technical resources and application notes on metallographic equipment and preparation methods.
- PACE Technologies: Application notes and guides on sample preparation techniques and material-specific procedures.
- QATM: Technical documentation and application guides on sample preparation equipment and techniques.
- Struers: Application notes and technical guides on sample preparation for various materials. Comprehensive online resources and literature.
Note: Metallography.org is supported by PACE Technologies. You may notice links to PACE Technologies products throughout our guides.
Professional Organizations
- ASM International: Leading materials science organization. Publishes standards, handbooks, and technical journals. Offers courses and conferences on metallography.
- International Metallographic Society (IMS): Organization dedicated to metallography. Hosts annual conferences and provides networking opportunities.
- ASTM International: Develops and publishes standards used in metallography. ASTM Committee E-4 on Metallography, established in 1916, has been instrumental in standardizing metallographic practices. Access to standards and technical committees.
Online Resources
- Metallography.org: This website provides comprehensive guides, resources, and tools for metallographic sample preparation.
- Materials Science Journals: Journals like Metallurgical and Materials Transactions, Materials Science and Engineering, and others publish research on microstructural analysis.
- University Resources: Many universities provide online resources, course materials, and educational content on metallography.
Continuing Education
Metallography is a skill that benefits from continuous learning:
- Workshops and Courses: Many organizations offer hands-on workshops and courses on metallographic techniques
- Conferences: Attend metallography and materials science conferences to learn about new techniques and network with other professionals, including the International Metallographic Society (IMS) Annual Conference,Materials Science & Technology (MS&T),TMS Annual Meeting, andASM International events
- Webinars: Online webinars from equipment manufacturers and professional organizations
- Certification Programs: Some organizations offer certification programs for metallographers
Building Your Library: Start with Vander Voort's "Metallography: Principles and Practice" and the ASM Handbook Volume 9. These two resources will cover most of your needs. Add specialized references as you work with specific materials or techniques.
Continue Your Learning
Ready to learn more? Explore our comprehensive guides on sample preparation techniques, or use our tools and resources to support your metallographic work.